Configuring WS_FTP Pro
and WS_FTP Pro Explorer
Our WS_FTP Pro configuration tutorial shows how to setup WS_FTP
Pro for
your XyNexT account. To configure WS_FTP Pro, follow the simple instructions below.
WS_FTP Pro: Open WS_FTP
Pro or Pro Explorer from your Start Menu.
If the "Session Properties" dialog box does not automatically appear,
click on the "Connect" button in the lower left hand corner of the WS_FTP
Pro window. Now click on New.
WS_FTP Pro Explorer: Open WS_FTP Pro
Explorer from your Start Menu or from within explorer.
Click on the New... icon at the top of the WS_FTP Pro Explorer
window.
The following information is the same for
both program versions.
We'll use an example account with XyNexT with the following info:
Domain name:
xyz.com
UserID: abcdefg
IP Address:
255.255.255.255
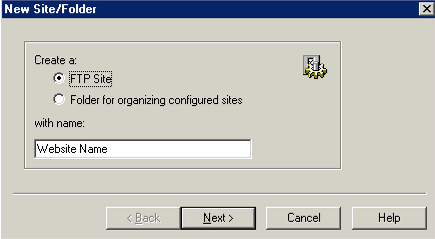
The "New Site/Folder" dialog
box will appear for you to enter a descriptive name
for the site (or to create a folder to organize your sites).
Click on Next.

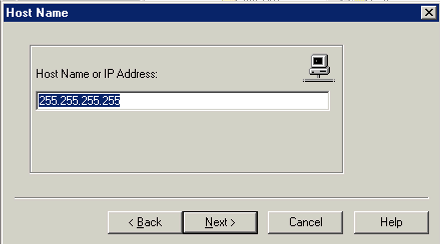
In the "Host Name" dialog
box, it is best to use the IP address of static IP
sites. If you don't know your Website's IP address, Click
Here for a simple utility
that will give you the IP address of your website. The domain name will
also work, but it will have to "resolve" to the IP address anyway.
Click on Next.

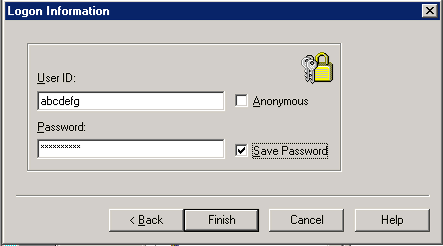
In the "Login
Information" dialog box, enter your userID and password.
Click on Finish.

That is normally all that's required.
If you need to do any advanced configuration for firewalls, etc., or if you made
an error during the setup, you can right-click on the site icon/name and then
click on "Site Properties" to access the
full set of property options.
That's it!
To obtain a free
evaluation copy of
WS_FTP Click here.
|